 Estava a tentar por um vídeo , mas o Youtube não está a colaborar, vamos ver se na 2ª já deixa.
Isto é um render de um corredor modelado em 3D no Blender, as texturas são Photoshop e o motor de render é o Yafray, que aconselho vivamente, dá um aspecto mais realista à iluminação, e é à borla.
Primeiro é o modelo, depois um render com o motor do Blender, e o último é um render com o Yafray depois de corrigir a iluminação. I was trying to upload a video, but Youtube isn't cooperating, let's hope on monday it will.
This is a render of 3D modeladed hallway I created in Blender. the textures are Photoshop, and the render engine is Yafray, wich I strongly recomend, givis lighting a more realistic feel, and it's free.
Firs is just the model, then the render with Blender, and the last one is a render using Yafray and corrected lighting.
I work as a freelancer or as a team member. I accept work proposals by mail.
30/06/2007
O corredor / The Hallway
29/06/2007
tutorial Blender - nodes

 Uma ferramenta bastante útil do Blender são os nodes.
Estes nodes podem ser usados para dar retoques ao render final, como neste tutorial, ou para retocar os materiais dos modelos.
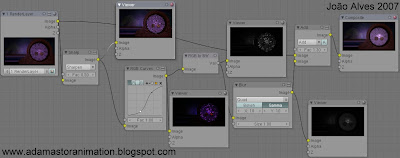
Na imagem em cima temos um exemplo do uso dos nodes, a adição de um brilho "fantasmagórico" a uma cena. É claro que este brilho pode ser alcançado utilizando outros programas (ferramentas como a Luma key do After Effects produzem um resultado semelhante) depois de termos o render simples do Blender, mas também podemos fazer tudo no Blender.
1- Dividam a área de trabalho na vertical ou na horizontal, (clicando com o botão direito no limite entre a zona 3D e a área dos botões ou nos limites laterais da área 3D, e seleccionem split na caixa que aparece)
 para aparecerem todos os tipos de janela, e nessa lista procurem o que diz nodes (tem este aspecto
 ). Seleccionem-no.
3- A janela deve continuar cinzenta com a grelha, mas está vazia e tem só 2 ícones e 2 botões na barra inferior, certo? Cliquem no ícone com a cara (se em vez de alterar o render quisessem alterar um material, aqui seleccionam a esfera em vez da cara) e no que diz "Use Nodes", porque vamos usá-los, se bem se lembram é para isso que serve este tutorial... continuando o aspecto é este
 . Deve aparecer uma janela pequena com um espaço para o render e com uns círculos amarelos, como a janela mais à esquerda da imagem em baixo.
4- Carreguem na tecla F12, para fazer o render da vossa cena. Podem fechar a janela do render depois terminado. Na janela que têm na zona de nodes deve estar uma miniatura do vosso render, tal como na imagem aqui em cima. Agora vem a parte dos nodes (Ena!).
5- Cliquem com o botão direito na zona vazia ao lado do node com o vosso render (sim aquela janelita com a miniatura do render e com as bolas amarelas é um node). No menu que aparece procurem Add e vão adicionando os nodes que vêem nesta imagem aqui em cima, antes do ponto "4-" (se clicarem na imagem ela aumenta e lê-se melhor). Eles estão divididos em várias categorias, vão abrindo cada uma para procurarem os que querem para este tutorial.
6- Liguem os nodes como estão a ver na imagem de cima, clicando na bola amarela e arrastando até à bola onde se quer ligar, o que faz com que apareçam as linhas pretas. alterem os valores em cada node de modo a ficarem contentes com o resultado final e cliquem novamente em F12. Este novo render já tem as alterações.
7- Explicando cada node.
O node inicial é o render normal.
O node Sharpen aumenta a nitidez do render inicial, acentuando diferenças de cor.
O node RGB curves faz uma correcção nas cores, neste caso de modo a ficarem apenas as zonas mais claras acentuadas e tudo o resto passar a preto, o que quer dizer que será transparente.
O node RGB to BW altera as cores para preto e branco.
O node Blur desfoca a imagem a preto e branco deixando meio enevoada, difusa.
O node Add vai adicionar a imagem do render inicial à imagem a preto e branco que obtiveram através dos nodes todos anteriores, com um factor indicado, gerando assim a imagem final.
Vão experimentando outros nodes e outros valores nestes nodes.
Alguma dúvida é só teclarem que eu respondo.
 A really useful tool in Blender are the nodes. They can be used to adjust renders, as in this tuturial, or to adjust materials.
This tutorial explais how to achieve the eery glow that you can see on the picture at the beginning of the post. You can achieve the same result using tools like the Luma key in After Effects, but this way you can do it all using only Blender. Here we go.
1- devide your working area by right-clicking one of the lateral limits, or the lower limit of the 3D working area. A menu will pop-up. Select Devide.
2- In the lower bar of this new window there is a little icon, like this
 , click on it. From the lis that pops-up, select this one
  , you just changed the type of window, from 3D work-space to nodes.
3- The window is grey with a black grid, and... nothing else. On the bottom you have 2 icons and 2 buttons
 , activate the one with the face, and the one that states "Use nodes" 'cause thats what we're here for right? To use'em. A little box will appear, that looks like the first one on the left in the image below, that's a node (you should be proud, it's your first node).
 4- Press the F12 key to do a render of your scene. When it finishes, close that window and look at your node, it has a miniature of the render in it, like you can see in the image above. Next, its node time!
5- Right-click on an empy space surrounding the node, in the menu that appeared select Add node. Now search for the nodes that you see in the above picture and add all of them.
6- Now connect them as you see in the image. To connect them left-click on the yellow circles of one node and drag the black line that appears to the circle on the other node you want to connect the first node with. After everything is connected as above try to adjust the values of each node to achieve something that you thing is right. Press F12 again. As you can see this new render is different from the first one.
7- Explaining each node.
The first node is your render, pure and simple.
The Sharp node sharpens the render, making edges more clear.
The RGB curves node changes the colors, in this case to achieve a n image that only shows the lighter places, leaving everithing else as black, wich will make it transparent.
The RG to BW node convers the colored render to a black and white one.
The Blur node will unfocus the render, giving it a foggy look.
The Add node adds the original render to the new one that you distorted with the nodes, according to the rate that you choose, thus generating the final render with the glow effect.
Have fun trying other nodes and other values.
Any questions feel free to ask.
25/06/2007
DEJ - Esboço limpo / Cleaned-up sketch
24/06/2007
DEJ - Vampires

 Mais cedo ou mais tarde tinham de voltar a este blog.
Vampiros são a minha criatura das trevas favorita desde criança. Voam, transformam-se em animais, têm super-força, bebem sangue, e primeiro que morram é uma carga de trabalhos.
Estes são esboços para os vilões do episódio piloto do Dead Eye Jack (DEJ). O estilo é Tim Burton e Gris Grimly, com uns toques de Ben Templesmith. Espero que gostem. Sooner or later they had to return to this blog.
Vampires are my favorite dark creatures since I was a kid. They fly, turn into animals, have super strenght, drink blood, and give a whole other level to the expression "Die Hard".
These are sketches for the vilains of the pilot episode of Dead Eye Jack (DEJ). This graphic style is a mix of Tim Burton and Gris Grimly with a little touch of Ben Templesmith. Enjoy.


